Saab Trionic 7 Engine Control Unit
Preface
This document gives a short introduction to the Saab Trionic 7 Engine Control Unit, ECU. There is also photographs to give a peek inside the ECU enclosure (better quality images coming soon). The software inside the ECU is discussed and there's an utility program that decodes some information from an ECU Flash ROM binary file. The last section deals with SaabOpenProg, the first freeware Trionic 7 CAN re-programmer.
Table of Contents
Saab Engine Control Unit
History
Currently there are three major types of Trionics. Saab 9000 series, new generation 900 series and 9-3 series before 2000 have Trionic 5. Saab 9-3 models from 2000 and all Saab 9-5's use Trionic 7. The new Saab 9-3 Sport Sedan/Sport Combi uses Trionic 8 (as does the new Opel Vectra).
Location in car
In a Saab 9-3 the ECU is situated on the right side of the car beside the front passengers (LHD) or drivers (RHD) feet. Before removing the ECU, you should remove the key from the ignition lock and disconnect the car battery. Opening one screw you can push the interior aside and continue to unscrew one Torx screw that holds the ECU. The cable connector has a snap lock, so it is easy and fast to disconnect the cable running to the ECU.
In the Saab 9-5 the ECU is in the engine compartment on the right side of the car near the windshield.
Inside the enclosure
The ECU enclosure has three stickers with different serial numbers printed on to them. To open the enclosure you must unscrew four Torx screws near the cable connector and two Torx screws on the bottom side. The printed circuit board is covered with a good layer of lakka that provides additional resistance to moisture.


The main processor seems to be a Motorola 683xx (also known as CPU32) family model. On the chip there's written the following markings:
185
16233970
G70J
YQQHT0106D
The ECU software is stored on an 4 MBit sized 8/16-bit Flash memory chip manufactured by AMD, Am29F400BT-90SI. There is a coprocessor from Philips, a P83C592FHA/019. It's an 8-bit 8051-based microcontroller with a CAN (Controller Area Network) module. As the CAN physical line driver there's a Intel AN82527. RAM memory is done by two 32 KBit SRAM chips (U62H256S1K). There's also a special component that would appear to be a barometric pressure sensor. On top of the component is written 16238669.


Engine control software
The software inside the Trionic 7 can be read through the diagnostics connector (OBD-2) and by soldering a 10-pin debugging header to the ECU component board. After the board has this BDM (Motorola Background Debug Module) header, the Flash ROM contents can be read with BDM hardware and software.
I've written a small Windows console program to print out some information from a Trionic 7 binary file. You can freely download the program with source code included:
Here's an example output from the program.
C:\>t7info "9-5 Aero 02-05 NU 300Hk (3.5 BTR).bin"
T7info v0.10 - Read information from a Saab Trionic 7 ECU
by Tomi Liljemark 2007-06-10

Length  ID    Data
     9  0x91  [0000000  ]
     7  0x94  [0000000]
    12  0x95  [EG03Y5OC.56W]
    30  0x97  [9-5 B235R EC2000 EU           ]
     4  0x9a  [0731]
     4  0x9c  [dcfbef00]
     4  0x9b  [e8490500]
     4  0xf2  [810b2154]
     4  0xfb  [4886dc85]
     4  0xfc  [0007ffff]
     4  0xfd  [00000000]
     4  0xfe  [00068340]
     5  0xfa  [42fbfaffff]
    15  0x92  [000000000000000]
     7  0x93  [0000000]
     2  0xf8  [03d3]
     2  0xf7  [967c]
     2  0xf6  [03e9]
     2  0xf5  [8b7c]
    17  0x90  [00000000000000000]
     4  0x99  [    ]
    10  0x98  [IOPOWER SE]
     1  0xf9  [1]

C:\>
Notice that with this example binary, some of the data fields have been cleared to zeroes to hide identification information. The program prints out data strings in ASCII, if all characters in the string are printable, otherwise data is shown in Hex values. I've added some checksum calculation starting from version 0.20. Use the parameter switch --csum to get checksum information from the given binary. I've added recalculation of checksums at version 0.50. If the program notices one or more checksums that don't match, it prompts the user if the checksums should be corrected.
C:\>T7info --csum "9-5 Aero 02-05 NU 300Hk (3.5 BTR).bin"
T7info v0.50 - Read information from a Saab Trionic 7 ECU
by Tomi Liljemark 2007-06-25

Checksum Misc : 0xC07A90EB
Checksum 70000: 0xFFFFFFFF
Checksum 0xF2 : 0x810B2154
Checksum 0xFB : 0x4886DC85

Calculated checksum Misc : 0xC07890EA - FAIL
Calculated checksum 70000: 0xFFFFFA15 - FAIL
Calculated checksum 0xF2 : 0x810B2148 - FAIL
Calculated checksum 0xFB : 0x4882DC81 - FAIL

Warning: One or more checksums did not match!

Do you want to recalculate checksums [y/N] ? n
Aborted, nothing written.

C:\>
In the above example the checksums calculated by the program do not match the checksums stored in ROM. The binary has been modified or the checksum has been changed by the person who has released this binary. Also, in this particular example, the "Checksum 70000" is not correct, because there is no data in the 0x70000 region of ROM.
As of version 0.50, there's one more option switch, --marry. With this the Vehicle identification number, VIN, and Immobilizer code can be changed without the use of a Hex editor. The program warns, if the VIN check symbol is not correct (verification code ported from The Official SAABNET.RU SAAB VIN Decoder by Ded-Kiley).
C:\>T7info --marry "9-5 Aero 02-05 NU 300Hk (3.5 BTR).bin"
T7info v0.50 - Read information from a Saab Trionic 7 ECU
by Tomi Liljemark 2007-06-25

Current values
--------------
Vehicle Identification Number: 00000000000000000
Immobilizer code             : 000000000000000

Enter new values
----------------
Vehicle Identification Number: YS3D1234567890123
Immobilizer code             : ABCDEFGHIJKLMNO

Warning: VIN check symbol incorrect!

Are you sure you want to change these codes [y/N] ? y
Changed.

C:\>
It goes without saying that always backup your binaries before using T7info to modify them.
Trionic 7 checksum calculation
1 Preface
The Trionic 7 ECU binary images uses several checksums to verify integrity. Most of them have been easy to figure out, but one of them is so complicated, that it seems to been done to deter map changing. There is still some unknowns, that would be nice to figure out. For example some binaries don't seem to have all four checksums I've discovered. And of course there could be more checksums that have gone unnoticed. I've written this for people who understand how to program, so I'm going to more details than is needed for the "normal user".
First I'll explain how to find the checksums from the binary. Two of the checksums are in the end of the binary and the two other ones are scattered in the code. The latter ones can be found be using pattern searching. After you know how to find the checksums, I'll show you how to calculate them by yourself. Again the calculations are pretty simple, and even the harder checksum is easy to implement. The last section is about my T7info utility, that is an example implementation for you to study.
Big thanks to solving these things goes to General Failure. Without his help I probably would have given up on this.
2 Where to find checksums
2.1 Checksum lexicon
First of all, there are four different checksums (that I know of). I've given them names since I don't know their real functions: FB checksum, F2 checksum, Misc checksum and Area 70000 checksum.
2.2 F2 and FB checksums
The first two checksums, FB and F2, can be found at the end of the binary. This end area has been called the file header (footer could be more logical ). It has been explained in more detail in the following thread: T7 file header. The F2 checksum is not present in all binaries I've seen, so be aware of this. Finding the two other checksums is more of a challenge.
2.3 Misc checksum
The Misc checksum resides inline with the code. It's usually found in the area of 0x02000...0x05000. The way I've found the checksum address is by pattern searching. I have a set of hex values along with mask bits. If a mask bit is not set, the corresponding hex value doesn't have to match. Here's the hex values, and the masks I'm using. Code:
Pattern
0x48,0xE7,0x00,0x3C,0x24,0x7C,0x00,0xF0,0x00,0x00,0x26,0x7C,0x00,0x00,0x00,0x00,0x28,0x7C,0x00,0xF0,0x00,0x00,0x2A,0x7C
Mask
1,   1,   0,   0,   0,   0,   1,   1,   1,   1,   0,   0,   0,   0,   1,   1,   1,   1,   0,   0,   0,   0,   1,   1
So, I'm searching the binary for a string of bytes beginning with 0x48, 0xE7, 0x00, 0x3C... Then I've masked out the bytes that change from binary to binary. When I've located this pattern, I know where to start. Now I start primitively disassembling the code. I search for byte patterns [0x48,0x6D], [0x48,0x78], [0x48,0x79], [0x2A,0x7C] and [0xB0,0xB9]. The three first patterns reveal addresses and lengths of checksum areas. There are 15 checksums areas from which the Misc checksum is calculated. The [0x2A,0x7C] pattern gives a base address for the [0x48,0x6D] addresses. Bare with me. These [0x2A,0x7C] addresses are summed with the base address to make the actual address. This way the address is only 2 bytes long. On the [0x48,0x79] addresses it's 4 bytes long without any base address. And the [0x48,0x78] pattern gives 2 bytes which correspond with the length of the checksum area. Finally the [0xB0,0xB9] pattern is followed by 4 bytes to the address of the Misc checksum.
As you've probably noticed, it's a bit hard to explain this in writing. Check the source code of my example implementation for more information.
2.4 Area 70000 checksum
This checksum refers to an area in the region of 0x70000. Like the Misc checksum, I don't have a nice clean way of finding out the length of the area along with the checksum address. I'm using pattern searching with this also. I've run into binaries that are not compatible with this approach, so this requires some fixing in the future. Code:
Pattern
0x20,0x3c,0x00,0x00,0x11,0x52,0x2F,0x00,0x20,0x3C,0x00,0x00,0x09,0xD0,0x2F,0x00,0x20,0x3C,0x00,0x00,0x00,0xCC,0xD0,0x9F
Mask
1,   1,   0,   0,   0,   0,   1,   1,   1,   1,   0,   0,   0,   0,   1,   1,   1,   1,   0,   0,   0,   0,   1,   1
After finding that pattern, I sum the masked addresses together. In the pattern, the original addresses are 0x00001152, 0x000009D0 and 0x000000CC. Summing these gives the Area 70000 length of 0x1BEE. At the same time this is the address where to find the Area 70000 checksum.
3 How to calculate a checksum
3.1 FB checksum
The FB checksum shares the same calculation method as Misc and Area 70000 checksums. It's simply a sum of the bytes from the checksum area. Four bytes are made into a 32 bit value and summed with the next 32-bit value. This goes on until there are fewer than 4 bytes left. The last 1...3 bytes are then individually summed together with the checksum. Here's a code snippet from my program to show how I coded it in C. Code:
unsigned int calc_csum(unsigned char *bin, unsigned int start, int length)
{
    unsigned int addr;
    unsigned char data[4];
    unsigned char checksum8;
    unsigned int checksum;
    int count;

    addr = start;
    checksum = 0;
    count = 0;

    while( count < (length >> 2) && addr < 0x7FFFF )
    {
        data[0] = *(bin+addr+0);
        data[1] = *(bin+addr+1);
        data[2] = *(bin+addr+2);
        data[3] = *(bin+addr+3);
        checksum += (unsigned int)(data[0] << 24 | data[1] << 16 | data[2] << 8 | data[3]);
        addr += 4;
        count++;
    }
    count = count << 2;
    checksum8 = 0;

    while( count < length && addr < 0x7FFFF )
    {
        data[0] = *(bin+addr);
        checksum8 += data[0];
        addr++;
        count++;
    }

    checksum += checksum8;
}
3.2 F2 checksum
This is the most non-reverse-engineer-friendly checksum of the lot. The idea is to sum 32-bit values together like in the FB checksum method. But in this case, before a new value is summed, it is first XOR'ed with an another value. This XOR value is taken from a XOR table, that has eight different 32-bit values. The used value is rotated, so that the same value is used every eight sum. Unlike in the FB checksum calculation, there is no per byte summing in the end. The start and end addresses for the checksum can be found from the binary file header, in IDs 0xFD (=start) and 0xFE (=length or end). After the checksum area has been summed together, it is XOR'ed one final time with a special value and subtracted with an another value. The XOR table seems to be static, but there could be binaries that have a different table. Here's my take on the algorithm, in C. You can see the XOR table in the beginning and the special XOR and subtract values in the end. Code:
unsigned int calc_csum_f2(unsigned char *bin, unsigned int start, int length)
{
    unsigned int addr;
    const int xor_table[8] = { 0x81184224, 0x24421881, 0xc33c6666, 0x3cc3c3c3,
                               0x11882244, 0x18241824, 0x84211248, 0x12345678 };
    unsigned char data[4];
    unsigned char xor_count;
    unsigned int temp, checksum;
    int count;

    addr = start;
    checksum = 0;
    count = 0;
    xor_count = 1;

    while( count < length && addr < 0x7FFFF )
    {
        data[0] = *(bin+addr+0);
        data[1] = *(bin+addr+1);
        data[2] = *(bin+addr+2);
        data[3] = *(bin+addr+3);
        temp = (unsigned int)(data[0] << 24 | data[1] << 16 | data[2] << 8 | data[3]);
        checksum += temp ^ xor_table[xor_count++];
        if( xor_count > 7 ) xor_count = 0;
        addr += 4;
        count += 4;
    }

    checksum ^= 0x40314081;
    checksum -= 0x7FEFDFD0;

    return checksum;
}
3.3 Misc checksum
The Misc checksum is a sum of the individual checksums calculated from 15 areas. The used checksum calculation the same as with the FB checksum.
3.4 Area 70000 checksum
Once you have found the length of the Area 70000, you can calculate the checksum by using the function described in section 3.1 FB checksum. The start address is 0x70000. Notice that your binary might not have this area present.
Trionic 7 Seed-Key Algorithm
Introduction
According to the SAE J2190 standard (Enhanced E/E Diagnostic Test Modes) vehicle manufacturers should employ a Challenge-Response scheme to protect against unauthorized access (e.g. ECU re-programming or reading of ECU ROM). I'll explain below how this scheme is implemented on Trionic 7. The reverse-engineering of this algorithm was needed for my freeware Trionic 7 CAN Reader/Programmer to work. The authentication works by first requesting a Seed value from the Trionic. After you get this pseudo-random number, you have to calculate the correct Key value and send it back for verification. Both of them are 16-bit integer values.
Algorithm
There are at least two differet algorithm in place. I don't know why, or if there's more of them. The two I have discovered share the same operations, but differ in used integer values. It seems that you have to try the first one, and if it fails, use the second method (this is how the BSR PPC operates).
Method #1

Get 16-bit Seed value
Multiply Seed by 4 (i.e. two logical shift left operations)
XOR result with 8142h
Subtract result with 2356h
Result is the 16-bit Key value

Method #2

Get 16-bit Seed value
Multiply Seed by 4 (i.e. two logical shift left operations)
XOR result with 4081h
Subtract result with 1F6Fh
Result is the 16-bit Key value
The way I found this algorithm was by using the P&E; Micro USB debugger. I started a Trionic and sent a Seed request through the P-Bus, after I saw what the Seed value was, I halted the Trionic and dumped the whole RAM contents to a text file. I studied the dump and found were the Seed values seemed to pop up. I noticed that right besides them was also a changing 16-bit value. After I had confirmed with the use of a disassembler that those really were the RAM locations where the Seed and Key values were kept, I tested it. After halting the processor and checking the memory locations, I modified my test application to send the correct Key value after letting the processor run again. The reply from the Trionic was 'accepted', so I had found the right RAM locations and from that the ROM code that generated the Seed and Key values.
SaabOpenProg - Freeware Trionic 7 CAN Reader/Programmer
Introduction
The SaabOpenProg is a Windows console application that uses a Lawicel CANUSB adapter to read or re-program the Flash memory of the Trionic 7 ECU via the Saab I-Bus or P-Bus. Figure 6 below shows a successful session with the SaabOpenProg. Reading the ROM will take about 12 minutes, while writing a new ROM takes only about 6 minutes. Times apply to P-Bus connections, I-Bus is slower, with about 22 min read time. This is due to the underlaying protocol, which requires messages from the Trionic to be acknowledged. When the sending data to the Trionic, the Trionic can acknowledge the whole group of packets with just one acknowledgement.
I've added an Raw Write mode to version 0.80. This means that you can change the Hardware serial number (a.k.a. Immobilizer code) on a binary, and write it to the Trionic. That would not be possible with the normal Write mode. Next on the agenda is to get Verify-After-Write to work. I have also plans to develop a software that supports e.g. ELM327 to provide programming via the OBD-II diagnostic connector.
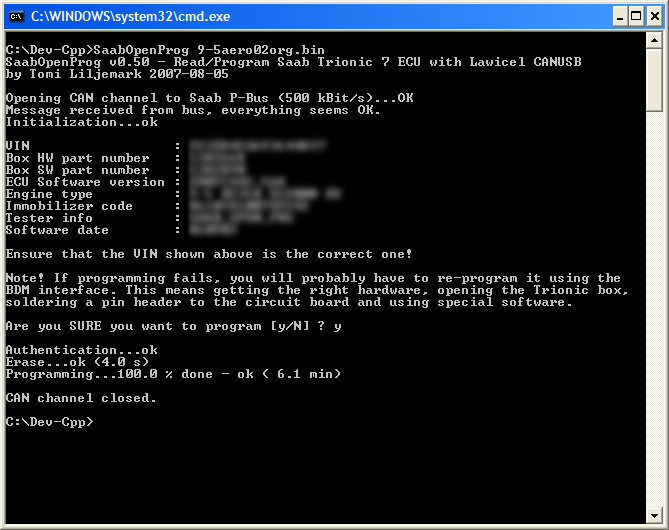 Figure 6. Screenshot of SaabOpenProg
after programming has been done.
Figure 6. Screenshot of SaabOpenProg
after programming has been done.
Requirements
- Microsoft Windows (tested on XP)
- Lawicel CANUSB adapter
- A connector adapter to get CANUSB connected to the Saab I-Bus (software works also with P-Bus)
Download
The application is freeware and has source code included. If you want to use my source code as a starting point for your own application, go right ahead (even commercial usage is allowed). You can download the application here:
THIS IS A BETA RELEASE WITH SOME TESTING DONE - USE AT YOUR OWN RISK!
Usage
Connect the CANUSB adapter to your laptop and the Saab I-Bus on the car you mean to re-program. It's also recommended to attach a battery charger to the car's battery and remove the low beam and engine cooling fan fuses. Start the application from the command-line with a binary filename as a parameter. The application will connect to the bus and retrieve information from the Trionic 7. After reading the warnings and ensuring that the VIN shown by the application is the correct one, answer Y to the 'Are you sure' question. Now, just wait about 20 minutes for the application to finish - DO NOT DISCONNECT POWER, CAN ADAPTER OR DO ANYTHING WITH THE LAPTOP while programming is underway. If programming is interrupted, you won't have access to the Trionic unit anymore. If this happens, you will have to reprogram the Flash using the BDM connection. This involves soldering a pin header to the Trionic circuit board and using a BDM interface circuit with special software.
As an alternative you can use SaabOpenProg to program a stand-alone Trionic 7 box. You need to supply power and ground to the unit, and have the P-Bus P+ and P- signals (plus ground) routed to a D9 connector for the CAN adapter. This is much safe, since there are less things that can go wrong. You can check the correct pins from Figure 7 below.
 Figure 7.
Trionic 7 pinout (Text by Patrik Servin).
Figure 7.
Trionic 7 pinout (Text by Patrik Servin).